+1 845 259 2974 (11 a.m to 7 p.m CST)
FREQUENTLY ASKED QUESTIONS
Getting Started with SecureTeen
What is SecureTeen? What can I do with SecureTeen?
SecureTeen is a comprehensive parental control application for your computers and cell phones. It is designed to provide you with easy controls to manage your child's online activities and to make their web surfing safe. SecureTeen also helps you to block unwanted games & apps, set time schedule for device usage, track location and various controls to protect your kid's device.
How SecureTeen works?
How SecureTeen works is fairly simple: : to start use of SecureTeen app, first you will need to Sign up an account/dashboard i.e. by configuring Parental Control app (blue icon app) on parental device or by logging into SecureTeen Web Dashboard in any browser of your PC or phone.
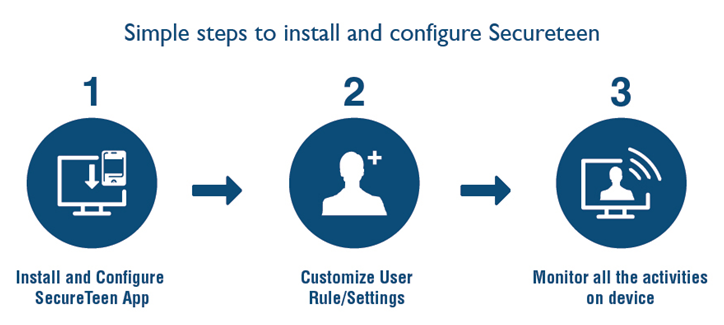
Step-1: After successful signup, you will add a device on dashboard so that you may find installation steps to perform Child App’s Installation (Green icon app) on monitored kid’s device.
- Add a Device/Profile on dashboard
- Find out given installation guide for Child app and perform its installation on monitored (child’s) device
Step-2: Next you set rules and make changes to registered device on dashboard remotely i.e. by logging into your SecureTeen web-based dashboard Or Parent App.
Step-3: After that all you have to do is monitor the activities of your teen via some PC/Laptop or the mobile device.
What platforms SecureTeen is Supported on?
SecureTeen is supported on the following platforms
- Microsoft Windows (XP and above)
- Android (2.2 Froyo and above)
- Apple iPhone and iPad (iOS 5 and above)
SecureTeen Dashboard
What is SecureTeen Dashboard?
SecureTeen Dashboard is the control center for your SecureTeen application. It is where you can manage devices, profiles (settings and data) and view reports at one place. You need a SecureTeen account to access your SecureTeen dashboard.
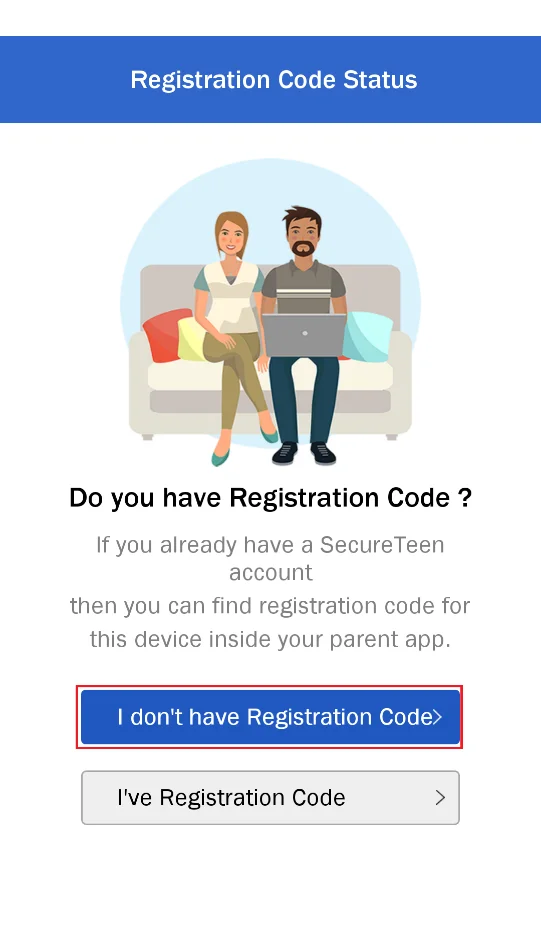
How can I obtain a SecureTeen Dashboard Account?
To obtain your SecureTeen account/dashboard, you will need to sign up with SecureTeen. This can be done by downloading and configuring SecureTeen Parental Control app on some android/iOS device. You may simply download blue-icon Parental App from Google Play/Apple App Store and signup for online dashboard with it.
You may also signup for SecureTeen with downloaded Child App on target device. Open Child app and select option “I don’t have registration code”. This option will guide you about how to get yourself registered with SecureTeen first.
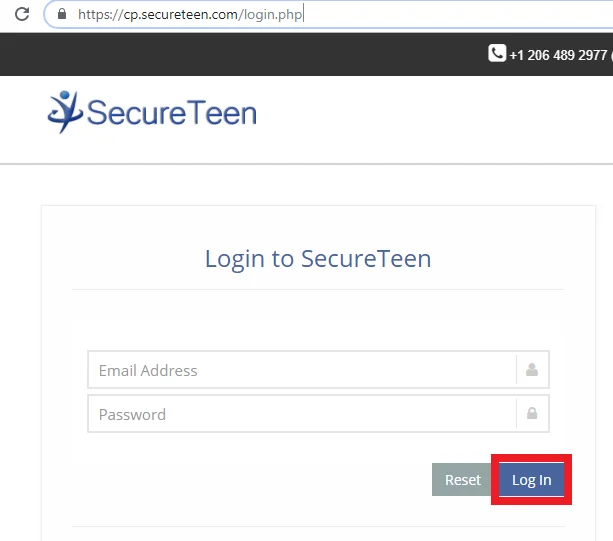
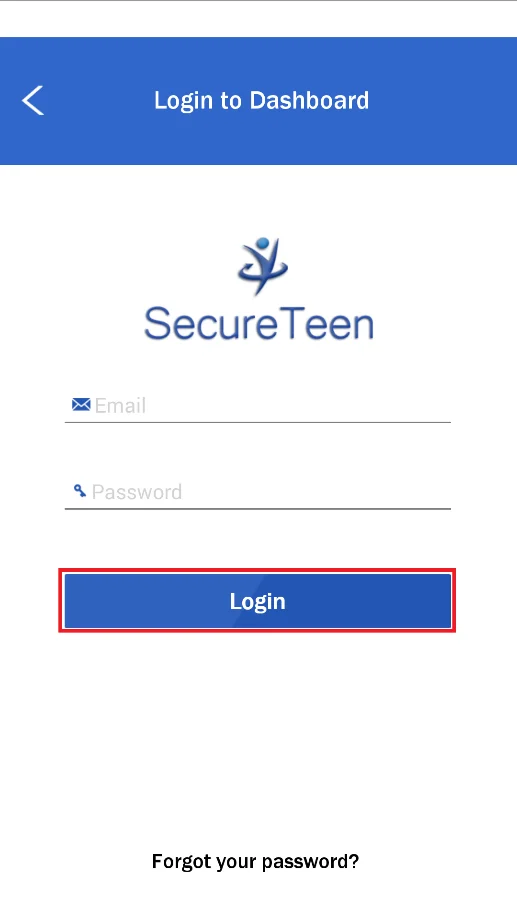
How can I login to SecureTeen Dashboard Account?
You can access your SecureTeen dashboard either from SecureTeen website (on its LOGIN page) Or via SecureTeen Parent app i.e. by using your set login-credentials for SecureTeen account/app.
Open browser, type www.secureteen.com in the address bar , go to login page, then enter login information (username and password) in the login area. Press 'Login' button and you will be directed to your dashboard.
Otherwise; you can simply open Parent App on parental device and sign in with your set login-credentials.
What should I do if I forgot my password?
If you forget the SecureTeen password, you must do one of the following
- Go to https://www.secureteen.com/login and click 'Forgot Password' button
- You can also get new password by opening the SecureTeen application which is installed on computer or cell phone and clicking the "Forgot Password" button on "Sign in" screen
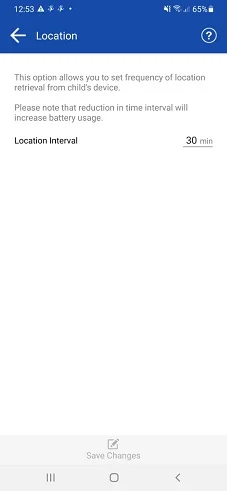
How do I set up location tracking on my kid's device?
Please make sure that the location service is enabled on the device otherwise SecureTeen will not be able to report location. You can enable location service by going to Settings of phone.
To customize time intervals to report child's device location, follow the instructions below
Log in to your dashboard and identify the Child (John, in this case) for which you want to customize the settings and click Rules. A tab will be opened. Click Location Settings

Default interval to locate the device is 8 minutes. You can set it according to your requirements. Click Save Changes after altering the interval. If settings are pushed on device successfully, you will see 'Updated on Device(s)' message in green; otherwise, you will see 'Waiting for an update from device(s). Please click refresh button to view updated status after a few minutes'. Message in red indicates that the changed settings have not updated on device yet;
How do I set same settings for all of my kids?
SecureTeen understands that you may need to have the same settings for all of your children. It allows users (clients) to set same Child Profile on multiple devices. Let's assume you have SecureTeen installed and configured on one of your child's device and now you want to install it on your other child's device. (SecureTeen allow you to monitor three devices if you have purchased the Basic License.) You may get this done following any of the two methods outlined below:
You can select the same Child Profile during installation when you are on 'Link Child' screen (while installing/configuring the device)
Or, you can configure the device against default or any other Child Profile for the time being and later re-link to a profile of your choice from your dashboard. See "Profile Management" section for details.
Mac/Windows PC Laptop Method for iOS devices!
What do I need to get started with iBackup?
The “iBackup” functions just like the iTunes backup service. It can fetch data from iOS device through USB as well as WiFi connection.
Please note that WiFi backup can only be taken if both iOS device and MAC / Windows PC-Laptop (containing the properly configured iBackup app) are connected to same Wifi network.
To start configuration, you will need the following:
1. Apple device(s) to be configured, iPhone or iPad.
2. A Mac Book or Windows PC-Laptop(preferably your home computer).
3. In case of Windows PC/Laptop, iTunes must be installed in advance on PC or Laptop.
4. A USB cable (also known as your charge cable) to plug your child's Apple device into the computer (required only for the first backup )
5. Internet access.
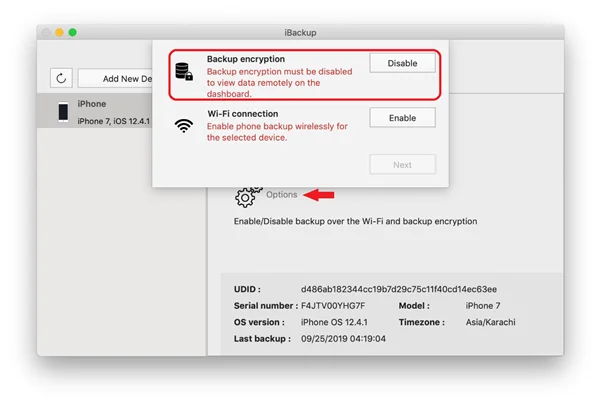
What can I do, if the iBackup Desktop App shows that 'Backup Encryption' option is enabled on target iOS device?
If iBackup desktop App shows that the 'backup encryption' settings is enabled on target iOS device, then you do not need to worry. You can check device Options (check red arrow on image below) and disable encryption by clicking the “Disable” button next to “Backup Encryption” on popup window.
OR you can do this on iTunes:
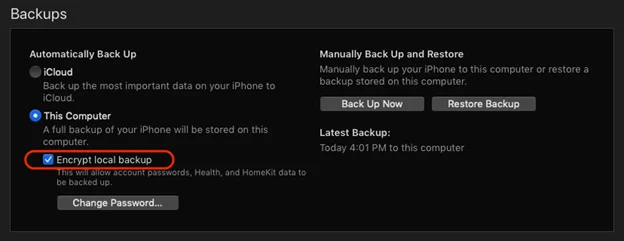
To uncheck "encrypt local backups" in iTunes, you will need to complete the following steps:
- Open iTunes
- Plug your child's iOS device into the computer
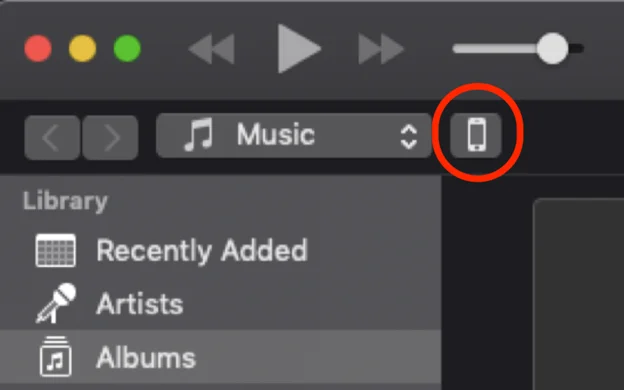
- Go to your child's Device Summary page by clicking on the tiny square phone icon button that appears at the top of iTunes, as seen in the image below:
- In the Device Summary page, please uncheck the "Encrypt Local Backups" checkbox
- Click Apply or Sync

If you are unable to do this, please go to Preferences in the iTunes menu. In Preferences, please select Devices. Delete all backups for your child's device in this list.
Adjusted device settings, but iBackup desktop App still says "Encryption Enabled"?
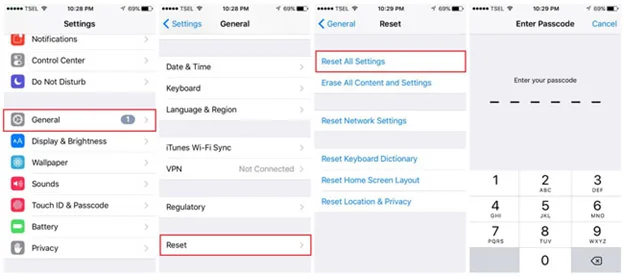
After adjusting the device settings, if the iBackup desktop app still says that encryption is enabled on the iPhone or iPad, then you may need to Reset the Settings of that device. Remember, this is not a complete Factory Reset that will affect your device's data. All it is going to do is remove your preferences for WIFI, Encryption, Bluetooth, Do Not Disturb, Notifications, General, Sounds, Brightness, Wallpaper, and Privacy.
NOTE: While this function does not remove any data from your iPhone, the software does recommend backing up your device to iTunes before doing this process.
Follow the steps below to Reset All Settings:
- Go to Settings > General > Reset > Reset All Settings
Is WiFi Assist on the iPhone or iPad interrupting the WiFi connection? How to turn off WiFi Assist?
You might have issue either while configuring iBackup app or upon fetching latest iCloud backup (after configuration) if the WiFi Assist will be enabled on target iOS device. If this WiFi Assist is turned ON on an iOS device, it will be using a combination of cellular data & WiFi to make connections to the internet i.e. network of device will keep on switching between WiFi and cellular data in order to ensure internet stability overthere. Which is why this setting may prevent the iBackup App from recognizing the same WiFi network over target iOS device.
Actually for iBackup Method configuration as well as for its latest iCloud backups later on, you will need to make sure the connectivity of same internet connection on both devices i.e. MAC and target iOS device. The enabled WiFi Assist option may prevent connectivity of same internet connection on target iPhone as connected on other MAC device. So you will need to turn this WiFi Assist option OFF first, for successful configuration and fetch iCloud backup attempts of this new iBackup Method.
How to turn off WiFi Assist on an iPhone or iPad:
- Go to Settings > Cellular or Mobile Data.
- Scroll down and tap the slider for WiFi Assist to turn off.
iPhone or iPad Has Not Backed-Up! Run into an error while backing up?
This could have happened if there was an interruption in your internet during the iCloud-backup upload. If the internet is not the issue, try switching your child's iOS device to Airplane Mode and try doing the backup again. If the problem still continues, reach out to SecureTeen Support for further assistance.
Children Profile Management
What is a child profile?
A Child Profile contains all the rules and settings which you wish to apply on a particular device. When you first create your main SecureTeen account, a Default Profile is created with default rules so that you don't have to spend much time on customizing your settings.
What are the ways to create a child profile?
You can either create a child profile from SecureTeen Dashboard or from the SecureTeen application during installation.
How do I create a child profile from my SecureTeen Dashboard?
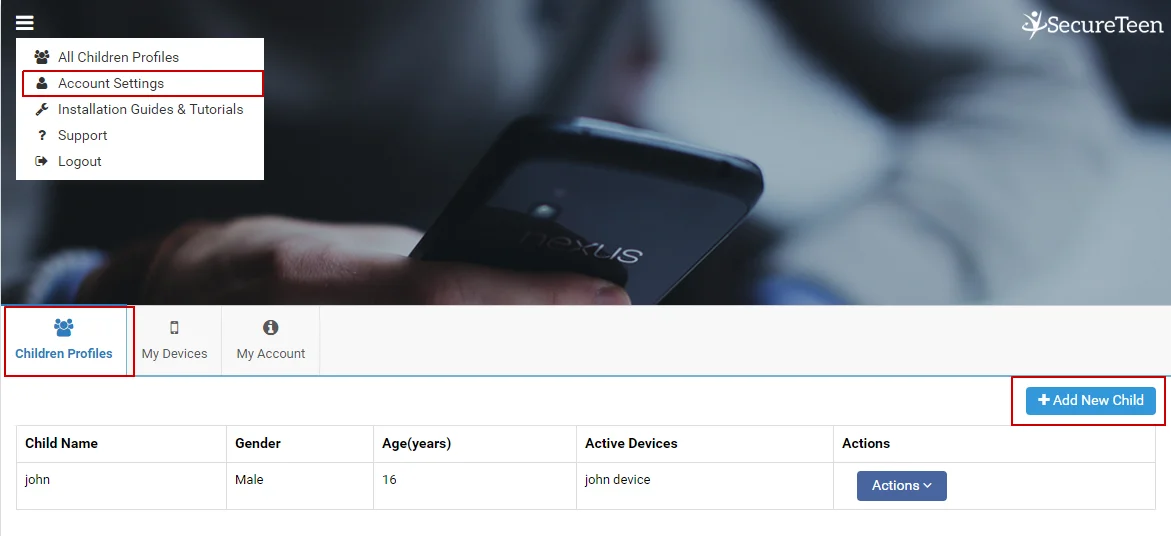
To create a Child Profile from SecureTeen Dashboard , please log in to your dashboard, then Click "Settings" and then click "Children Profiles" and then click "Add New Child" link as shown in figure
When you click on 'Add New Child' a popup will appear
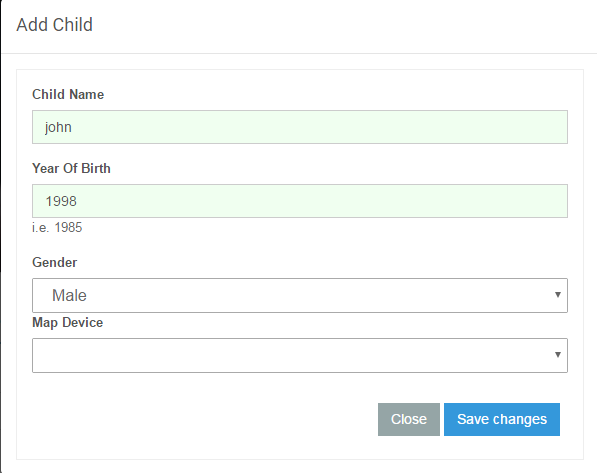
Enter 'Child Name' of your choice, child's 'Year of Birth', 'Gender' and select a 'Device' which you want be linked/mapped with this 'Profile'. 'Map Device' drop down menu will list all your devices that you have registered with SecureTeen during configuration process. It is an optional field. If you do not want any device to link with this 'Profile' right now, you can leave it unselected. You can link a device to any "Child Profile" later by following the instructions at "How to Link a child Profile to a Device". Click the 'Save' button when you are done.
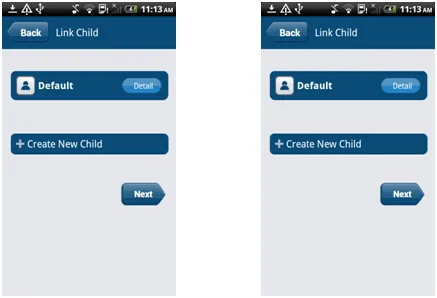
How do I create a child profile on Windows PC?
During Installation and device configuration, on 'Link Child' screen, there is a button labeled 'Create Child's Profile' to create a Child Profile.
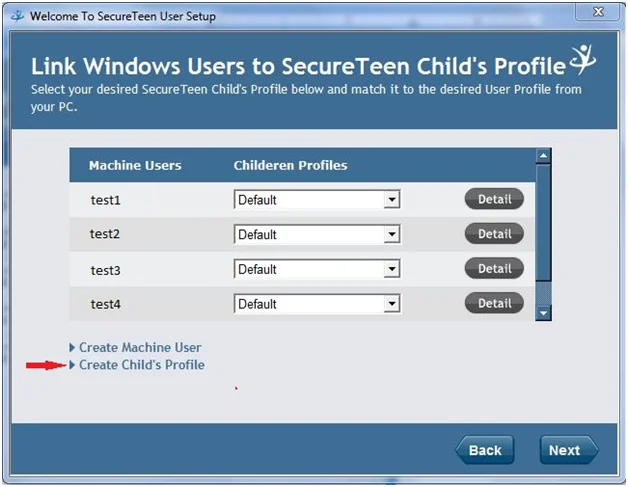
Link Child Screen during installation and device configuration
When you pick the 'Create Child's Profile' option you will see the 'Create Profile User' screen
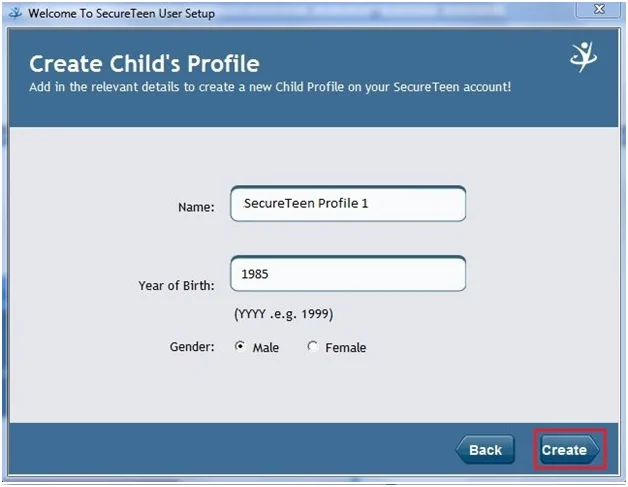
Create Child's Profile
Here you need to provide your desired child name, birth year, and gender. After providing the information, hit the 'Create' button. This will create a new child profile as shown in the figure below.

Link Child Screen during installation and device configuration
How do I edit a child profile?
Log in to your dashboard at www.secureteen.com website, and then open 'Account Settings' -> 'Children Profiles'. To edit child profile,(in this case John) click 'Edit Child Info' link as shown below.
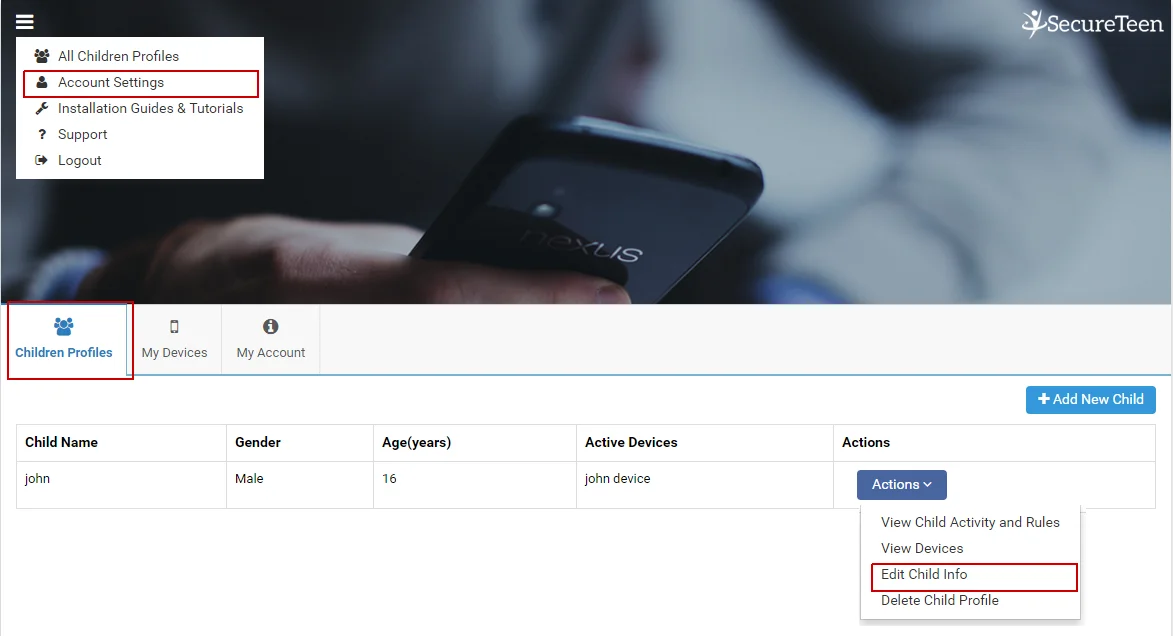
A popup will appear as shown in Figure. You can edit any of the fields in edit mode.
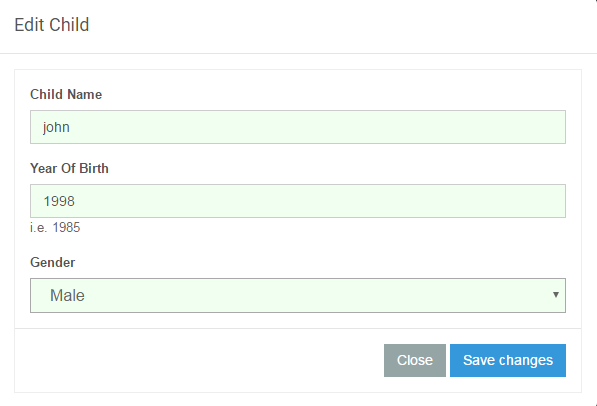
Make any desired changes and press the save button.
What are the ways to configure a device to use a particular child profile?
If you want to map the profile on a device, you can either map the profile during installation/configuration step on device Or through SecureTeen dashboard once SecureTeen gets installed on device.
How do I Link Child Profile to a device from SecureTeen Dashboard?
If you want to map a Child Profile on a device which already has SecureTeen then you can do it remotely from your SecureTeen dashboard.
Log in to your dashboard, open 'Account Settings' -> 'My Devices' and then Identify the device you wish to associate a child profile with(the device). Click 'Map Child Profile';
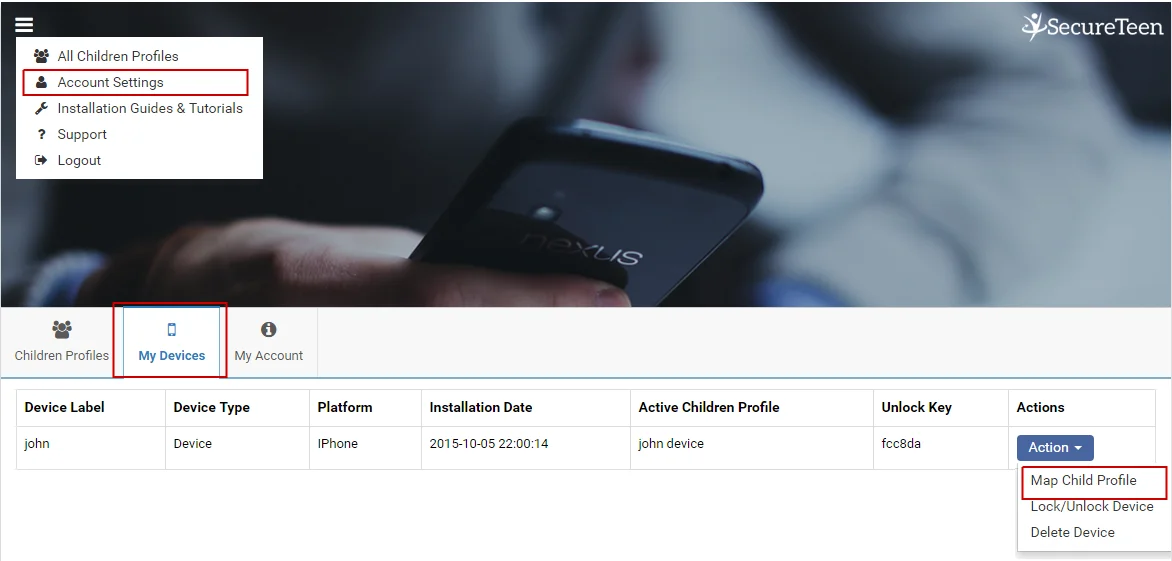
'My Devices'
A popup will appear when you click 'Map Child Profile' link. The current mapped Profile on that device will show as selected in dropdown menu;
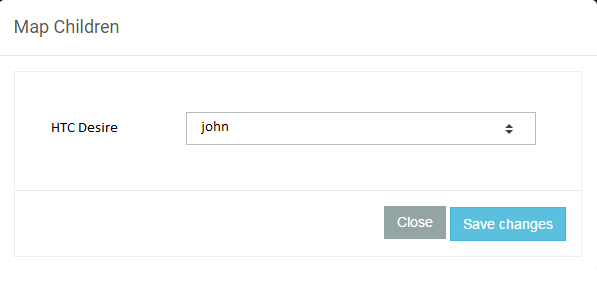
- Click to open the dropdown menu to see other available Children Profiles and then select the desired profile
- Now you can click the 'Map Child' button but before you click 'Map Child' button, you need to be sure that you really want to link the selected profile Child and device.
Once you select the Child Profile and click 'Map Child' button, this device will no longer be linked to previous Profile and all the rules that were previously active on the device will be overridden with the rules you have set for newly mapped Profile. Once you are sure about the child Profile and device to be linked, click 'Map Child' button.
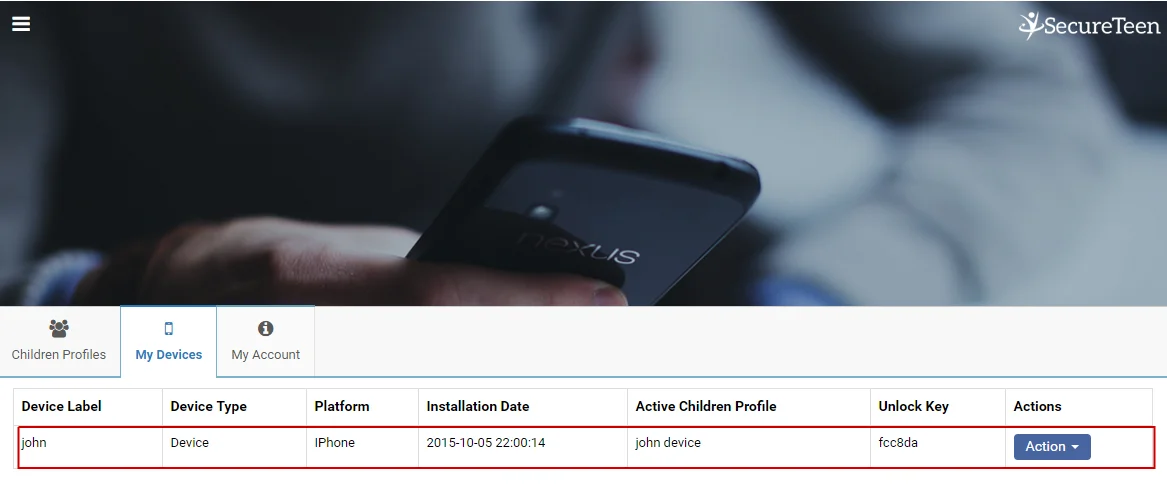
Successfully Mapped Child
If the device gets successfully linked to the selected Profile, active devices column of the Child Profile will display the name of the device that you have just linked with that Child.
How do I Link Child Profile from an Android device?
Linking child profile from a device is a fairly easy step. After installation, you just have to sign in to your SecureTeen account, register your device for this account and link child for this account.
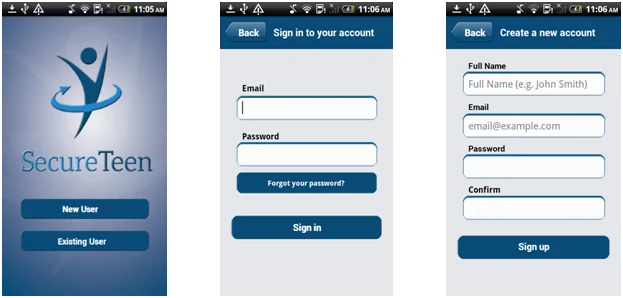
- Launch SecureTeen by pressing the SecureTeen icon available on the Home screen of your device. If you already have a SecureTeen account registered, press the 'Existing User' button, provide your login details and sign in (Figure 2).
- If you don't have SecureTeen account yet press the 'New User' button, then go to sign up screen and fill out the form. Hit the sign up button (Figure 3).
This step will allow you to register your device against your account. After successfully logging in you will see the Register Device screen (Figure 4)
- Provide a name of your choice in the Device Name field or leave it as the default device name.
Press Next.
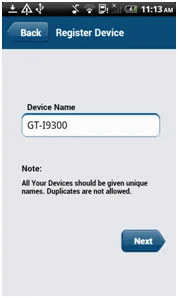
Figure 4 - Register Device
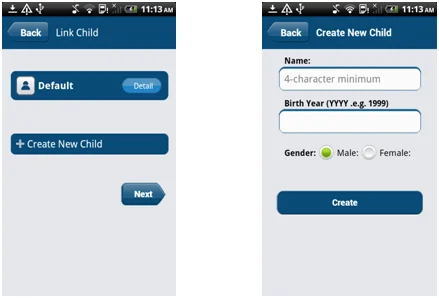
After registering your device, a 'Default' child will be created automatically. You can either use the 'Default' child or create a new one through the 'Create New Child' option.
- When you pick the 'Create New Child' option you will see the 'Create New Child' screen (Figure 6)
Here you need to provide your desired child name, birth year, and gender. After providing the information, hit the 'Create' button and it will take you to 'Link Child' screen (Figure 5) Now press Next.
Once the child is successfully linked to the device, you will see 'Finish' screen which lists the features activated on this device; see Figure 7. Press Finish.
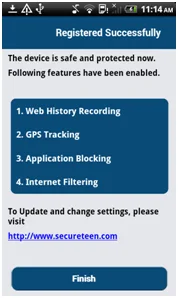
Figure 7 - Linked Successfully: Finish
How do I Link Child Profile from Windows PC?
If you do not have SecureTeen on your PC, you can link the child profile during installation.
- If you already have an SecureTeen login account, Press "Existing User" to login. If you do not have SecureTeen login account, Press "New User" (Figure 1)
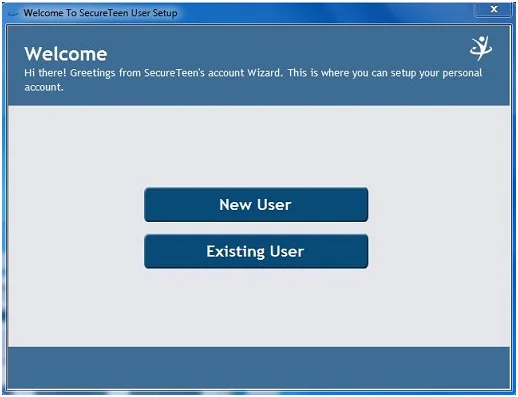
Figure 1
- Create New SecureTeen Account: Enter the required information, mentioned in the figure below (Figure 2). Press "Next"
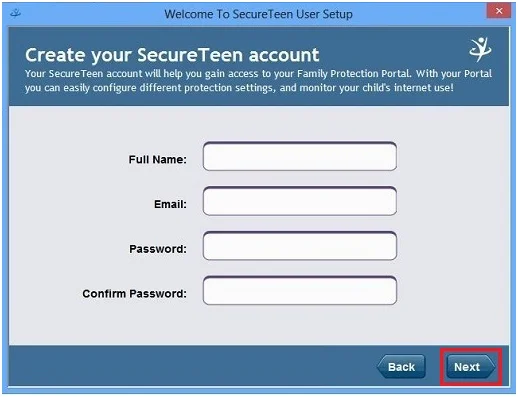
Figure 2
Existing User Login: Enter your SecureTeen username and credentials; Press "Next" (Figure 3).
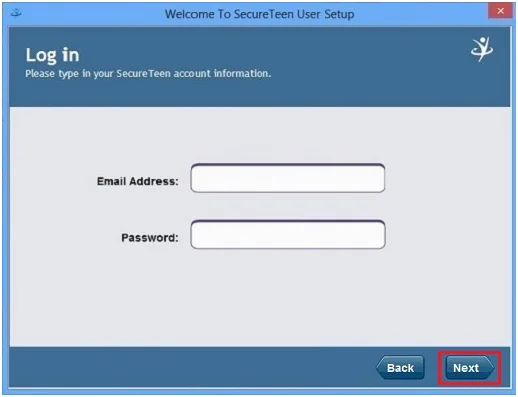
Figure 3
On successful login; select a name for your device, later on which will help you recognize your devices through your SecureTeen account while monitoring multiple devices. If you have any existing device against your SecureTeen account, you can select one from list of already registered devices. (Figure 4)
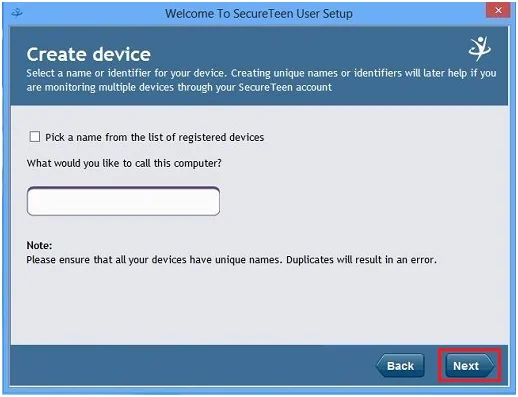
Figure 4
Now you need to choose your device linking type. There are two type of linking available for the SecureTeen account, Basic and Advance.
In Basic mode your all Machine Users will be mapped to a single SecureTeen Profile. Default profile will created automatically by administrator of the SecureTeen Dashboard. As shown in the Figure 5, Select first option and Press "Next". Now will lead you to finish page directly.
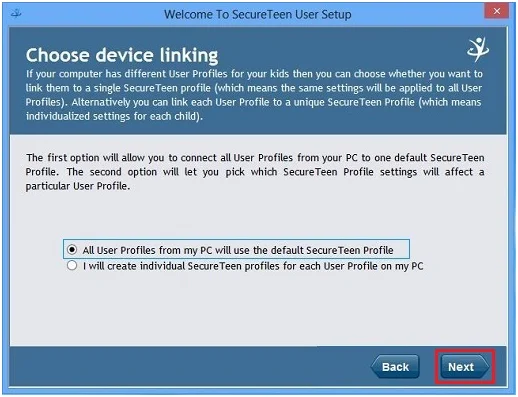
Figure 5
- In Advance Mode you can create your SecureTeen profiles of your own choice, new machine users can also be created directly from the setup. You can link one or multiple machine users against one SecureTeen profile.
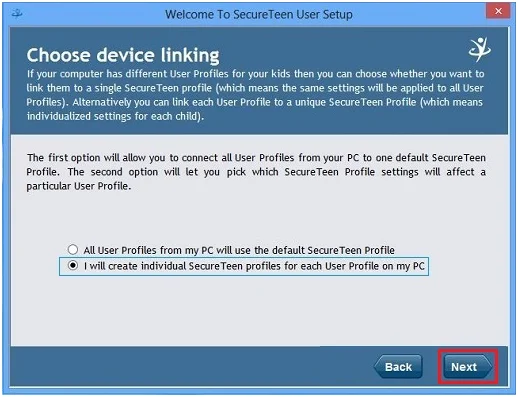
Figure 6
- Map machine users to SecureTeen profiles. Drop down menu will list the name of SecureTeen profiles. Default profile is already created, you can create a new SecureTeen profile by clicking "Create Profile" as shown Figure 7.
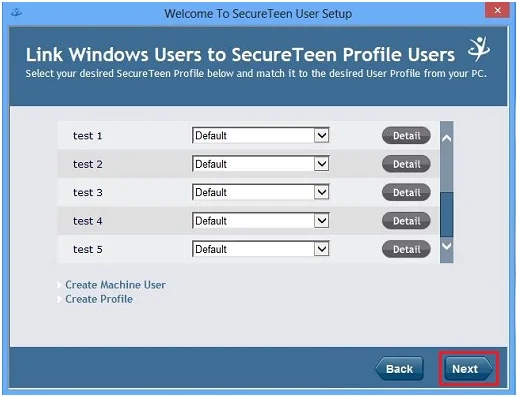
Figure 7
- Create New SecureTeen profile (Optional). (Figure 8)
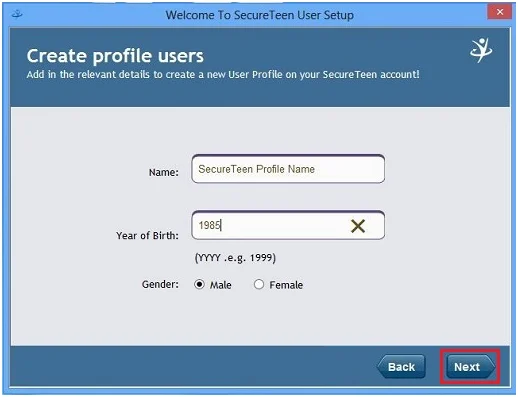
Figure 8
- Create New Machine User (Optional). (Figure 9)
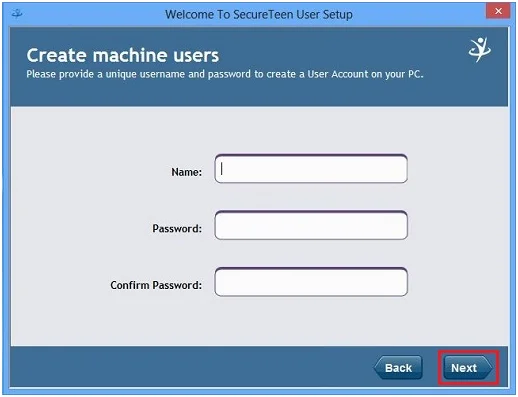
Figure 9
- Now Map Machine Users to SecureTeen Profile. We are mapping John,test2 & test3 with New SecureTeen profile and rest with the default as shown in Figure 10. Press "Next".
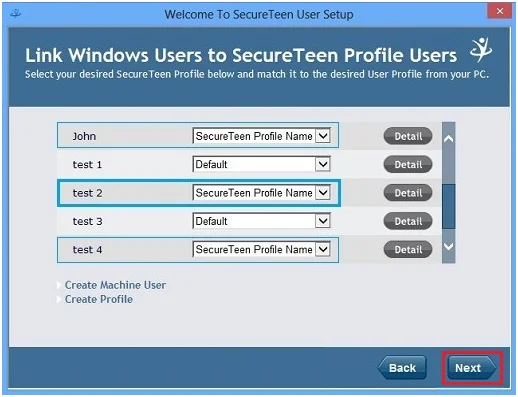
Figure 10
- When you will click "Next", setup will prompt a message box. This message box is warning you that all the previous mapping setting will be discarded and new mapping settings will be activated. (Figure 11)
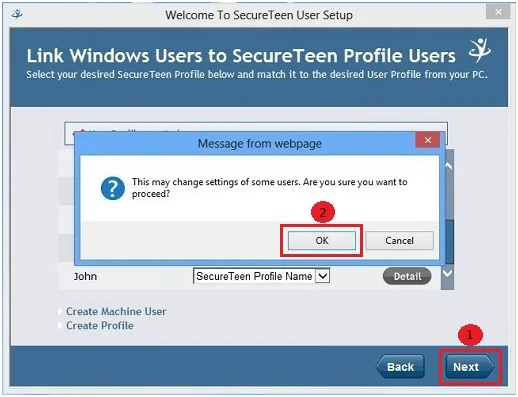
Figure 11
- Finish Screen will be appear. Press "Finish". (Figure 12)
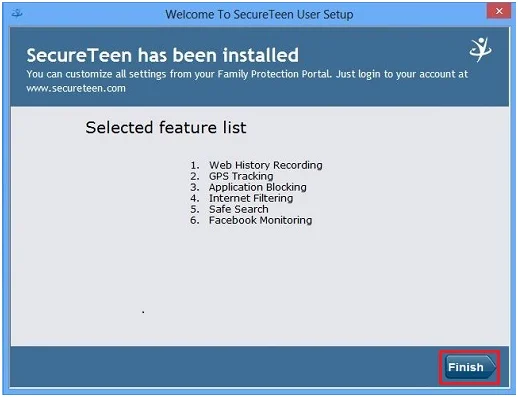
Figure 12
Technical Support
In case I cannot handle a problem, how do I contact technical support?
You can contact us by submitting a ticket at support@secureteen.com Or Call us at +1 845 259 2974 (11 a.m to 7 p.m CST) Or contact us through our dashboard help chat.
Please provide following information to help us investigate the issue
- Your SecureTeen email address
- The license id
- The device/machine name
- The user profile that is set up on the device